


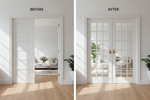
Builder-grade bifold doors do their job, but they rarely make a room feel finished. Converting them to French-style doors that swing open is one of the most satisfying weekend upgrades a homeowner can tackle, and it costs far less than most people expect. This guide compares three different conversion approaches by skill level and cost, then walks through each method step by step.
Can You Actually Convert Bifold Doors to French Doors?
The conversion is more straightforward than most homeowners expect, and it does not require replacing the door panels themselves. The key insight is that a bifold door is essentially two panels already sized to fill a closet or pantry opening. The only thing preventing them from functioning as French doors is the hardware system that makes them fold.
What Changes and What Stays the Same
The door panels themselves stay in place. What gets removed or modified is everything that creates the folding action: the top track, the roller pins that ride along the track, and the pivot hardware at the corners. Once those components are removed, the panels can be rehung using hinges attached to the door jamb, or restabilized using metal braces that prevent them from folding. The opening, the door frame, and the panels themselves require no structural modification in the vast majority of cases.
One Important Caveat About the Term French Doors
Technically, French doors have glass panels that allow light to pass between rooms. Most bifold doors are solid panels without glass, so the result of a conversion is more accurately described as double swing doors. In practice, homeowners and DIY communities use the terms interchangeably for interior applications, and the look and function are nearly identical. If the goal is to allow natural light to pass through the doorway, a full replacement with actual French doors that include glass panels is the better path. More on that at the end of this guide.

3 Methods Compared: Which One Is Right for Your Project?
There is no single correct way to convert bifold doors to French doors. The best method depends on your skill level, your budget, and how permanent and polished you want the result to be. The table below puts all three options side by side so you can pick the right starting point before reading the detailed instructions for each.
Method Comparison at a Glance
|
Method |
Cost Estimate |
Skill Level |
Time Required |
Best For |
|
Method 1: Mending braces |
Under $20 |
Beginner |
1 to 2 hours |
Closets with no door jamb; renters; fastest result |
|
Method 2: Hinges on door jamb |
$30 to $70 |
Intermediate |
2 to 4 hours |
Standard closets with a wood door jamb; most polished result |
|
Method 3: Bifold pivot hardware |
Under $10 |
Beginner |
1 hour |
No drilling into jamb needed; easiest hardware-only solution |
Method 1 using mending braces is the fastest and cheapest, but the two panels swing as a single unit rather than independently.
Method 2 with hinges produces the most finished result and gives each panel true independent swing, but requires a wood door jamb and some door width adjustment.
Method 3 repurposes the bifold hardware itself and requires the least modification of any opening or frame.

Method 1: Mending Braces (Beginner, Under $20)
This is the simplest conversion method and requires no door jamb, no hinge routing, and no cutting. It works by rigidly connecting the two folding panels with flat metal plates so they can no longer fold. The doors then use the existing pivot points at the top and bottom corners to swing open as one combined unit, much like a single wide door.
What You Need
Six mending braces in either 3-inch or 6-inch size, depending on the weight and thickness of your doors. Larger, heavier doors benefit from the longer braces. You will also need a magnetic catch to hold the doors closed once the folding mechanism is removed, a second door handle if your current setup has only one, and a standard drill and screwdriver. Total hardware cost runs under $20 at any home improvement store.
Step-by-Step Instructions
Start by removing the door panels from the track. On most bifold setups this means pushing down the spring-loaded top pin and lifting the door up and out of the bottom bracket.
Set both panels flat on the floor with the back side facing up. Straighten the two panels so they are perfectly flush with each other, then attach two mending braces across the joint at the top, middle, and bottom of the fold, three braces total, screwed firmly into the back face of both panels. The braces must keep the panels completely rigid, so check that the joint is straight before tightening the final screws.
Reinstall the now-rigid door unit onto the existing pivot hardware at the corners. Install a magnetic catch at the top of the door and a corresponding metal plate on the door frame header so the doors stay closed when you want them to.

Known Limitations of This Method
The two panels swing as one large unit from a single pivot point rather than as two independent doors. The opening clearance is the same as before, meaning one side of the opening is always partially blocked when the door is open.
The magnetic catch alignment can also be tricky if the frame header is drywall rather than wood. In that case, a small wood block glued to the header provides the surface needed for the catch hardware to grip securely.
Method 2: Hinges on Door Jamb (Intermediate, $30 to $70)
This method produces the most finished, professional-looking result and makes each panel function as a genuinely independent door. It requires a wood door jamb on both sides of the opening and involves a small amount of width adjustment on each panel in most cases. The result is indistinguishable from a purpose-built pair of swing doors.
What You Need
Six door hinges, three per door, in a non-mortise style if you want to avoid routing. Non-mortise hinges fold flat into each other without requiring a routed recess, which simplifies installation significantly. You will also need a magnetic or ball catch per door, a second door handle if only one exists, a drill, measuring tape, pencil, wood filler for the old pivot pin holes, sandpaper, and primer and paint if refinishing the panels. Budget between $30 and $70 depending on hinge quality and hardware finish.
How to Calculate Door Width Before You Start
This step is where most conversions either succeed or create problems. Bifold panels are typically sized to fill the full opening width when folded, which means they are almost always slightly too wide to hang as individual hinged doors once you account for hinge thickness and the gap between door edges.
The formula is: take the total opening width, subtract 0.25 inches for the center gap between the two doors, subtract 0.125 inches per door for non-mortise hinge allowance (or 0.0625 inches per door for routed hinges), and divide the remaining width by two.
That number is the finished width each panel needs to be. If your panels are wider than that, trim the amount off the inside edge of each door, not the outside edge, to keep the finished face intact.

Hinge Placement Guide
Standard door hinge placement puts the top hinge 6 to 7 inches from the top of the door, the bottom hinge 10 to 11 inches from the bottom, and the middle hinge centered between those two points.
Mark these positions on the door panel first, then hold the panel in its final position (approximately 0.5 inches off the floor and 0.25 inches from the top of the jamb) and transfer the hinge marks to the jamb. Pre-drill all pilot holes before driving screws to prevent the wood from splitting.
See more: Interior French Door Sizes: Complete Guide to Standard and Custom Dimensions
Step-by-Step Instructions
Remove the bifold track, all pivot hardware, and both door panels. Fill the old pivot pin holes on each panel with wood filler, let dry, and sand smooth. Trim the panel width if your calculation shows it is needed.
Attach three hinges to the outer edge of each panel with the hinge pins facing the front of the door. With a helper holding the first panel in position at the correct height and clearance, mark the jamb at each hinge location, predrill, and screw the hinges to the jamb.
Repeat for the second panel on the opposite side. Install magnetic catches at the top of each door aligned with a catch plate on the header, and install handles centered on each panel. Test the swing and shim as needed.

Handling the Gap Above the Door
Removing the bifold track almost always leaves a visible gap between the top of the door panels and the door frame header. The cleanest fix is a strip of 1x4 lumber cut to the opening width, painted to match the jamb, and nailed flush against the header to close the gap. An alternative is to rehang the panels slightly higher during installation to reduce the gap, though this limits floor clearance at the bottom. For very small gaps under half an inch, a bead of caulk painted over is often sufficient.
Considering a full upgrade with real glass panels? Explore the interior French door collection at Doors and Beyond: Browse French Doors at Doors and Beyond
Method 3: Bifold Pivot Hardware on Both Sides (Beginner, Under $10)
This method repurposes the bifold system itself rather than replacing it with hinges. Instead of one panel pivoting on existing pins while the other folds, both panels are given their own independent pivot points on the outside edges, allowing each to swing open separately from the shared top track.
What You Need
One additional set of bifold pivot hardware, which typically costs under $10 and is available at any home improvement retailer. You will also need a magnetic catch per door and a drill. No jamb modification is required, which makes this method ideal for openings where the sides are drywall without a wood frame for hinges to attach to.
Step-by-Step Instructions
Separate the two door panels at the fold by removing the hinges connecting them at the middle. Each panel should now be a single flat slab.
Take the original bifold hardware components from the inner edges of the panels and reinstall equivalent pivot hardware on the outer edges of both panels, one on each side.
Slide both panels back onto the existing top track, one from each end. Each panel now pivots independently from the outer edge rather than folding inward at the center.
Install magnetic catches so each panel holds closed independently. Fill and touch up the old hardware holes on the inner edges with wood filler and paint.

When This Method Works Best
Method 3 is best suited for situations where the opening sides are drywall with no accessible wood framing, where a rental or temporary situation makes permanent jamb modifications impractical, or where the existing pivot hardware is still in good condition and reusing it is preferable.
The result is slightly less polished than Method 2 because the top track and its hardware remain visible, but it is structurally sound and functions well for closets, pantries, and laundry rooms.
Finishing Touches That Make the Difference
The hardware conversion is only half of what transforms converted bifold doors into something that genuinely looks intentional. How the doors are finished once they swing determines whether the result reads as a budget patch or a real design upgrade.
Adding Trim for a Paneled Look
Flat-panel bifold doors are the most common type, and they look plain even after a successful hardware conversion. The fastest way to add visual interest is to frame the door face with 1x4 or 1x3 trim boards cut to create a rectangular panel pattern and attached with wood glue and finishing nails.
A single center frame gives the door a classic two-panel look. Two frames stacked vertically create a four-panel craftsman appearance. Prime and paint the trim in the same color as the door for a clean, unified finish, or in a contrasting color for a bolder effect.

Shiplap for a Farmhouse Feel
For a more textured, farmhouse-style look, thin strips of plywood or shiplap boards cut to uniform width and attached horizontally across the door face with wood glue and a brad nailer create a distinctive surface that works well in laundry rooms, mudrooms, and casual living spaces. Use pennies as spacers between strips to keep the horizontal gap consistent. Sand and prime before painting to prevent raised grain from showing through the topcoat.
Hardware and Handle Selection
Handle placement on converted bifold doors should be at the center of each panel rather than at the outer edge where a standard door handle would typically sit. This keeps both doors visually balanced and functionally easy to open together. Dummy handles, which have no latch mechanism, are the most common choice since the doors meet at the center rather than latching into a strike plate. Finish choices like matte black, burnished bronze, or brushed nickel all work well, provided they match existing hardware in the same room.
See more: How to Install Interior French Doors

When to Replace Instead of Convert
The three methods above work well for most closets, pantries, and laundry rooms. But there are situations where the DIY conversion produces a result that falls short of what the space actually needs, and where investing in real French doors is the more practical long-term decision.
When the Panels Themselves Are the Problem
Bifold doors that are warped, cracked, or damaged at the fold hinge often cannot be converted cleanly. A warped panel will not hang straight on hinges, and the gap at the center of two misaligned panels is difficult to correct without replacing the door.
Hollow-core bifold doors are also lighter and thinner than purpose-built swing doors, which can make them feel flimsy once they are no longer supported by the track system. If the panels are in poor condition, replacing them entirely produces a better result with less effort than trying to work around the damage.
When the Room Needs Light to Pass Through
Converting bifold doors to swing doors changes how they open but does not change what they are made of. If the goal is to allow natural light to travel between a living room and an adjacent space, or to visually connect two rooms while still having a door that closes, solid converted panels cannot deliver that effect.
Only French doors with actual glass panels accomplish that. The visual and functional difference is significant enough that in light-sensitive spaces, a full replacement with glazed interior French doors is worth the additional cost.

Sizing Considerations Before Ordering
If a full replacement is the right call, the existing bifold opening is already close to the right size for a pre-hung interior French door unit. Standard interior French door pairs come in widths from 48 to 72 inches. Measure the rough opening width between the interior faces of the jamb and the height from the floor to the underside of the header before ordering. Most pre-hung units need a rough opening approximately 2 inches wider and taller than the door unit itself to allow for shimming and leveling during installation.
See more: What Is a Single French Door? Features, Pros and Cons
Final Thoughts
Converting bifold doors to French doors is one of the more accessible interior upgrades a homeowner can take on without professional help. The method that fits your project depends on whether you have a wood door jamb to work with, how polished a result you need, and how much time you want to spend. When the panels themselves are the limiting factor, or when the space genuinely needs glass, a full replacement is the cleaner path forward.
Ready to go beyond the conversion? Browse interior French doors at Doors and Beyond, available in standard and custom sizes to fit your existing opening: Shop Glasss French Doors at Doors and Beyond
How to Convert Bifold Doors to French Doors: 3 Methods, Step-by-Step

Builder-grade bifold doors do their job, but they rarely make a room feel finished. Converting them to French-style doors that swing open is one of the most satisfying weekend upgrades a homeowner can tackle, and it costs far less than most people expect. This guide compares three different conversion approaches by skill level and cost, then walks through each method step by step.
Can You Actually Convert Bifold Doors to French Doors?
The conversion is more straightforward than most homeowners expect, and it does not require replacing the door panels themselves. The key insight is that a bifold door is essentially two panels already sized to fill a closet or pantry opening. The only thing preventing them from functioning as French doors is the hardware system that makes them fold.
What Changes and What Stays the Same
The door panels themselves stay in place. What gets removed or modified is everything that creates the folding action: the top track, the roller pins that ride along the track, and the pivot hardware at the corners. Once those components are removed, the panels can be rehung using hinges attached to the door jamb, or restabilized using metal braces that prevent them from folding. The opening, the door frame, and the panels themselves require no structural modification in the vast majority of cases.
One Important Caveat About the Term French Doors
Technically, French doors have glass panels that allow light to pass between rooms. Most bifold doors are solid panels without glass, so the result of a conversion is more accurately described as double swing doors. In practice, homeowners and DIY communities use the terms interchangeably for interior applications, and the look and function are nearly identical. If the goal is to allow natural light to pass through the doorway, a full replacement with actual French doors that include glass panels is the better path. More on that at the end of this guide.
3 Methods Compared: Which One Is Right for Your Project?
There is no single correct way to convert bifold doors to French doors. The best method depends on your skill level, your budget, and how permanent and polished you want the result to be. The table below puts all three options side by side so you can pick the right starting point before reading the detailed instructions for each.
Method Comparison at a Glance
|
Method |
Cost Estimate |
Skill Level |
Time Required |
Best For |
|
Method 1: Mending braces |
Under $20 |
Beginner |
1 to 2 hours |
Closets with no door jamb; renters; fastest result |
|
Method 2: Hinges on door jamb |
$30 to $70 |
Intermediate |
2 to 4 hours |
Standard closets with a wood door jamb; most polished result |
|
Method 3: Bifold pivot hardware |
Under $10 |
Beginner |
1 hour |
No drilling into jamb needed; easiest hardware-only solution |
Method 1 using mending braces is the fastest and cheapest, but the two panels swing as a single unit rather than independently.
Method 2 with hinges produces the most finished result and gives each panel true independent swing, but requires a wood door jamb and some door width adjustment.
Method 3 repurposes the bifold hardware itself and requires the least modification of any opening or frame.
Method 1: Mending Braces (Beginner, Under $20)
This is the simplest conversion method and requires no door jamb, no hinge routing, and no cutting. It works by rigidly connecting the two folding panels with flat metal plates so they can no longer fold. The doors then use the existing pivot points at the top and bottom corners to swing open as one combined unit, much like a single wide door.
What You Need
Six mending braces in either 3-inch or 6-inch size, depending on the weight and thickness of your doors. Larger, heavier doors benefit from the longer braces. You will also need a magnetic catch to hold the doors closed once the folding mechanism is removed, a second door handle if your current setup has only one, and a standard drill and screwdriver. Total hardware cost runs under $20 at any home improvement store.
Step-by-Step Instructions
Start by removing the door panels from the track. On most bifold setups this means pushing down the spring-loaded top pin and lifting the door up and out of the bottom bracket.
Set both panels flat on the floor with the back side facing up. Straighten the two panels so they are perfectly flush with each other, then attach two mending braces across the joint at the top, middle, and bottom of the fold, three braces total, screwed firmly into the back face of both panels. The braces must keep the panels completely rigid, so check that the joint is straight before tightening the final screws.
Reinstall the now-rigid door unit onto the existing pivot hardware at the corners. Install a magnetic catch at the top of the door and a corresponding metal plate on the door frame header so the doors stay closed when you want them to.
Known Limitations of This Method
The two panels swing as one large unit from a single pivot point rather than as two independent doors. The opening clearance is the same as before, meaning one side of the opening is always partially blocked when the door is open.
The magnetic catch alignment can also be tricky if the frame header is drywall rather than wood. In that case, a small wood block glued to the header provides the surface needed for the catch hardware to grip securely.
Method 2: Hinges on Door Jamb (Intermediate, $30 to $70)
This method produces the most finished, professional-looking result and makes each panel function as a genuinely independent door. It requires a wood door jamb on both sides of the opening and involves a small amount of width adjustment on each panel in most cases. The result is indistinguishable from a purpose-built pair of swing doors.
What You Need
Six door hinges, three per door, in a non-mortise style if you want to avoid routing. Non-mortise hinges fold flat into each other without requiring a routed recess, which simplifies installation significantly. You will also need a magnetic or ball catch per door, a second door handle if only one exists, a drill, measuring tape, pencil, wood filler for the old pivot pin holes, sandpaper, and primer and paint if refinishing the panels. Budget between $30 and $70 depending on hinge quality and hardware finish.
How to Calculate Door Width Before You Start
This step is where most conversions either succeed or create problems. Bifold panels are typically sized to fill the full opening width when folded, which means they are almost always slightly too wide to hang as individual hinged doors once you account for hinge thickness and the gap between door edges.
The formula is: take the total opening width, subtract 0.25 inches for the center gap between the two doors, subtract 0.125 inches per door for non-mortise hinge allowance (or 0.0625 inches per door for routed hinges), and divide the remaining width by two.
That number is the finished width each panel needs to be. If your panels are wider than that, trim the amount off the inside edge of each door, not the outside edge, to keep the finished face intact.
Hinge Placement Guide
Standard door hinge placement puts the top hinge 6 to 7 inches from the top of the door, the bottom hinge 10 to 11 inches from the bottom, and the middle hinge centered between those two points.
Mark these positions on the door panel first, then hold the panel in its final position (approximately 0.5 inches off the floor and 0.25 inches from the top of the jamb) and transfer the hinge marks to the jamb. Pre-drill all pilot holes before driving screws to prevent the wood from splitting.
See more: Interior French Door Sizes: Complete Guide to Standard and Custom Dimensions
Step-by-Step Instructions
Remove the bifold track, all pivot hardware, and both door panels. Fill the old pivot pin holes on each panel with wood filler, let dry, and sand smooth. Trim the panel width if your calculation shows it is needed.
Attach three hinges to the outer edge of each panel with the hinge pins facing the front of the door. With a helper holding the first panel in position at the correct height and clearance, mark the jamb at each hinge location, predrill, and screw the hinges to the jamb.
Repeat for the second panel on the opposite side. Install magnetic catches at the top of each door aligned with a catch plate on the header, and install handles centered on each panel. Test the swing and shim as needed.
Handling the Gap Above the Door
Removing the bifold track almost always leaves a visible gap between the top of the door panels and the door frame header. The cleanest fix is a strip of 1x4 lumber cut to the opening width, painted to match the jamb, and nailed flush against the header to close the gap. An alternative is to rehang the panels slightly higher during installation to reduce the gap, though this limits floor clearance at the bottom. For very small gaps under half an inch, a bead of caulk painted over is often sufficient.
Considering a full upgrade with real glass panels? Explore the interior French door collection at Doors and Beyond: Browse French Doors at Doors and Beyond
Method 3: Bifold Pivot Hardware on Both Sides (Beginner, Under $10)
This method repurposes the bifold system itself rather than replacing it with hinges. Instead of one panel pivoting on existing pins while the other folds, both panels are given their own independent pivot points on the outside edges, allowing each to swing open separately from the shared top track.
What You Need
One additional set of bifold pivot hardware, which typically costs under $10 and is available at any home improvement retailer. You will also need a magnetic catch per door and a drill. No jamb modification is required, which makes this method ideal for openings where the sides are drywall without a wood frame for hinges to attach to.
Step-by-Step Instructions
Separate the two door panels at the fold by removing the hinges connecting them at the middle. Each panel should now be a single flat slab.
Take the original bifold hardware components from the inner edges of the panels and reinstall equivalent pivot hardware on the outer edges of both panels, one on each side.
Slide both panels back onto the existing top track, one from each end. Each panel now pivots independently from the outer edge rather than folding inward at the center.
Install magnetic catches so each panel holds closed independently. Fill and touch up the old hardware holes on the inner edges with wood filler and paint.
When This Method Works Best
Method 3 is best suited for situations where the opening sides are drywall with no accessible wood framing, where a rental or temporary situation makes permanent jamb modifications impractical, or where the existing pivot hardware is still in good condition and reusing it is preferable.
The result is slightly less polished than Method 2 because the top track and its hardware remain visible, but it is structurally sound and functions well for closets, pantries, and laundry rooms.
Finishing Touches That Make the Difference
The hardware conversion is only half of what transforms converted bifold doors into something that genuinely looks intentional. How the doors are finished once they swing determines whether the result reads as a budget patch or a real design upgrade.
Adding Trim for a Paneled Look
Flat-panel bifold doors are the most common type, and they look plain even after a successful hardware conversion. The fastest way to add visual interest is to frame the door face with 1x4 or 1x3 trim boards cut to create a rectangular panel pattern and attached with wood glue and finishing nails.
A single center frame gives the door a classic two-panel look. Two frames stacked vertically create a four-panel craftsman appearance. Prime and paint the trim in the same color as the door for a clean, unified finish, or in a contrasting color for a bolder effect.
Shiplap for a Farmhouse Feel
For a more textured, farmhouse-style look, thin strips of plywood or shiplap boards cut to uniform width and attached horizontally across the door face with wood glue and a brad nailer create a distinctive surface that works well in laundry rooms, mudrooms, and casual living spaces. Use pennies as spacers between strips to keep the horizontal gap consistent. Sand and prime before painting to prevent raised grain from showing through the topcoat.
Hardware and Handle Selection
Handle placement on converted bifold doors should be at the center of each panel rather than at the outer edge where a standard door handle would typically sit. This keeps both doors visually balanced and functionally easy to open together. Dummy handles, which have no latch mechanism, are the most common choice since the doors meet at the center rather than latching into a strike plate. Finish choices like matte black, burnished bronze, or brushed nickel all work well, provided they match existing hardware in the same room.
See more: How to Install Interior French Doors
When to Replace Instead of Convert
The three methods above work well for most closets, pantries, and laundry rooms. But there are situations where the DIY conversion produces a result that falls short of what the space actually needs, and where investing in real French doors is the more practical long-term decision.
When the Panels Themselves Are the Problem
Bifold doors that are warped, cracked, or damaged at the fold hinge often cannot be converted cleanly. A warped panel will not hang straight on hinges, and the gap at the center of two misaligned panels is difficult to correct without replacing the door.
Hollow-core bifold doors are also lighter and thinner than purpose-built swing doors, which can make them feel flimsy once they are no longer supported by the track system. If the panels are in poor condition, replacing them entirely produces a better result with less effort than trying to work around the damage.
When the Room Needs Light to Pass Through
Converting bifold doors to swing doors changes how they open but does not change what they are made of. If the goal is to allow natural light to travel between a living room and an adjacent space, or to visually connect two rooms while still having a door that closes, solid converted panels cannot deliver that effect.
Only French doors with actual glass panels accomplish that. The visual and functional difference is significant enough that in light-sensitive spaces, a full replacement with glazed interior French doors is worth the additional cost.
Sizing Considerations Before Ordering
If a full replacement is the right call, the existing bifold opening is already close to the right size for a pre-hung interior French door unit. Standard interior French door pairs come in widths from 48 to 72 inches. Measure the rough opening width between the interior faces of the jamb and the height from the floor to the underside of the header before ordering. Most pre-hung units need a rough opening approximately 2 inches wider and taller than the door unit itself to allow for shimming and leveling during installation.
See more: What Is a Single French Door? Features, Pros and Cons
Final Thoughts
Converting bifold doors to French doors is one of the more accessible interior upgrades a homeowner can take on without professional help. The method that fits your project depends on whether you have a wood door jamb to work with, how polished a result you need, and how much time you want to spend. When the panels themselves are the limiting factor, or when the space genuinely needs glass, a full replacement is the cleaner path forward.
Ready to go beyond the conversion? Browse interior French doors at Doors and Beyond, available in standard and custom sizes to fit your existing opening: Shop Glasss French Doors at Doors and Beyond


