


Installing French doors can completely transform a home by improving natural light, creating elegant transitions between interior and exterior spaces, and increasing overall property value. Many homeowners assume the process requires professional contractors, but with the right preparation, tools, and patience, installing French doors can be achieved as a DIY project. This guide explains how to install French doors step by step, including preparation, tools, installation stages, and common mistakes to avoid.
Tools and Materials Needed to Install French Doors
Before starting the installation process, preparing the correct tools ensures the work can be completed efficiently and safely. Installing French doors requires both measuring tools and framing tools to properly align and secure the door frame. Having all necessary materials prepared in advance also helps avoid interruptions once the installation process begins.
|
Tool |
Purpose |
|
Tape measure |
Measure rough opening and door size |
|
Level |
Ensure the frame is perfectly straight |
|
Drill and screws |
Secure the door frame |
|
Shims |
Adjust alignment of the door frame |
|
Pry bar |
Remove existing doors or trim |
|
Caulk gun |
Seal edges for insulation |
|
Hammer |
Assist with framing adjustments |
These tools help ensure that measurements are accurate, the frame remains stable during installation, and the door is properly sealed once the installation is complete. Preparing everything in advance also allows you to focus fully on alignment and structural safety when installing French doors.
To better understand how door components work together during installation, see more:
https://doorsandbeyond.com/blogs/blog/the-essential-parts-of-a-door-all-you-need-to-know

Preparation Before Installing French Doors
Before installing French doors, preparation is the most important stage of the entire process. Proper planning ensures the door unit fits correctly and operates smoothly once installed. This stage usually involves measuring the rough opening, checking structural support within the wall, and removing any existing doors or framing materials.
Taking time to prepare the opening carefully helps avoid alignment issues, structural problems, and air leaks after installation.
Measure the Rough Opening
Measure both the width and height of the existing opening carefully using a tape measure. It is recommended to measure in multiple places to ensure the opening is consistent across the frame. French doors require a slightly larger rough opening than the door unit itself so that installers can adjust the frame using shims during installation.
|
Door Size |
Rough Opening |
|
60 x 80 inches |
62 x 82 inches |
|
72 x 80 inches |
74 x 82 inches |
Accurate measurements are essential because even small errors can cause the door frame to sit unevenly inside the wall opening. A properly sized rough opening ensures the French doors can be aligned correctly and operate smoothly after installation.

Check Wall Structure
If you are installing French doors in an exterior wall, it is important to determine whether the wall is load bearing. Load bearing walls support the structural weight of the building and therefore require proper headers to distribute the load above the door opening.
Failing to install the correct structural support can lead to sagging, cracking drywall, or long term structural damage. If you are unsure whether the wall is load bearing, consulting a contractor or structural professional before installing French doors is recommended.
Remove the Existing Door or Opening
If the installation replaces an existing door or window, remove the current door panels, trim, and frame using a pry bar. Take care not to damage the surrounding wall framing while removing these components.
Once the old door is removed, clean the entire opening thoroughly and inspect for uneven framing, damaged wood, or moisture issues. Preparing a clean and stable opening ensures the new French doors can be installed securely and aligned properly.

Step by Step Guide to Installing French Doors
Installing French doors involves several precise steps that must be followed carefully to ensure the door operates properly and remains weather resistant. Each step plays an important role in maintaining the stability of the door frame and preventing long term issues such as water leaks or misaligned panels.
Following a structured installation process helps ensure the final result looks professional and functions smoothly.
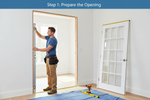
Step 1: Prepare the Opening
Before installing the door frame, inspect the rough opening carefully to ensure it is square, level, and structurally sound. Use a level to check both vertical and horizontal alignment of the framing. If the floor or framing is uneven, adjust the surface using shims or minor framing corrections before placing the door unit.
Preparing the opening correctly is essential because the entire door installation depends on the accuracy of this base structure.
Step 2: Install the Sill Pan
A sill pan is an important protective component installed at the bottom of the door opening. It prevents water from entering the house by directing moisture away from the door frame and toward the exterior surface.
|
Component |
Purpose |
|
Sill pan |
Directs water away from door |
|
Flashing tape |
Prevents water intrusion |
|
Sealant |
Improves insulation |
Installing a sill pan significantly reduces the risk of water damage around exterior French doors. Without proper moisture protection, rainwater can slowly penetrate the frame area and cause long term structural damage to surrounding materials.

Step 3: Position the Door Frame
Carefully lift the French door unit and place the frame into the prepared opening. Depending on the door size, this step may require two people to ensure the frame remains stable during positioning.
Once the frame is inside the opening, temporarily hold it in place using shims while checking alignment. Ensuring the frame sits evenly within the opening helps simplify the next steps of leveling and securing the structure.
Step 4: Shim and Level the Frame
Use a level to check that the frame is perfectly vertical on both sides and level across the top. Insert shims between the frame and the wall studs where adjustments are required.
Proper shimming ensures the door frame stays stable and prevents twisting or warping over time. When installing French doors, accurate leveling is critical because even small alignment errors can cause the door panels to rub against the frame or fail to close properly.
Step 5: Secure the Frame
Once the frame is fully aligned, secure it by drilling screws through the frame and into the surrounding wall studs. Tighten screws gradually while continuously checking alignment with a level.
Securing the frame evenly helps prevent shifting during long term use. Proper anchoring also ensures the frame remains structurally stable when the door panels are opened and closed repeatedly.

Step 6: Hang the Door Panels
Attach the door panels to the hinges installed on the frame. After mounting the doors, open and close both panels several times to confirm they move smoothly and align correctly when closed.
Double swing doors are often used in wider openings because they create better movement between connected spaces. See more:
https://doorsandbeyond.com/blogs/blog/types-of-swing-doors
Step 7: Install Hardware
Install the door handles, locking mechanism, and strike plate according to the manufacturer instructions. Proper alignment of hardware components ensures the doors close securely and lock correctly.
Hardware installation also contributes to the durability of the door system. If the handle or lock is misaligned, the door may not close properly or may place unnecessary pressure on the hinges over time.
Step 8: Seal and Weatherproof
Once the door frame and panels are installed, seal the perimeter of the frame using exterior grade caulking. Proper sealing prevents air leaks and protects the door frame from rainwater and moisture.
|
Sealing Method |
Benefit |
|
Exterior caulk |
Prevents air leaks |
|
Weatherstripping |
Improves insulation |
|
Flashing tape |
Protects against moisture |
Effective sealing improves energy efficiency and helps maintain indoor comfort by preventing drafts. It also extends the lifespan of the door installation by protecting the structure from moisture damage.
Common Mistakes When Installing French Doors
Even experienced DIY installers can encounter problems when installing French doors if small details are overlooked. Many installation issues occur due to inaccurate measurements, improper frame alignment, or insufficient sealing around the door frame.
|
Mistake |
Result |
|
Incorrect measurements |
Door does not fit opening |
|
Uneven frame |
Doors stick or misalign |
|
Poor sealing |
Air and water leaks |
|
Weak anchoring |
Door frame shifts over time |
Avoiding these common mistakes helps ensure the door operates smoothly and remains durable for many years. Taking extra time during measurement and alignment stages significantly reduces the likelihood of installation problems.
How Long Does It Take to Install French Doors
The time required to install French doors depends largely on the complexity of the installation and the condition of the existing opening. Projects that replace an existing door frame typically require less preparation compared to installations that involve structural modifications.
|
Project Type |
Estimated Time |
|
Replacing existing door |
4 to 6 hours |
|
Installing into new opening |
1 to 2 days |
|
Exterior wall modification |
2 to 3 days |
Planning the installation timeline in advance helps ensure the project proceeds smoothly. More complex installations may require additional time for structural adjustments, framing work, and finishing details.
For a detailed cost breakdown including materials, hardware, and labor factors, see more: https://doorsandbeyond.com/blogs/blog/how-much-does-a-french-door-cost-tips-to-save-your-money
Conclusion
Installing French doors is a rewarding home improvement project that can significantly enhance the appearance and functionality of a space. With proper planning, accurate measurements, and careful installation techniques, homeowners can successfully complete this project without professional assistance. By following the steps outlined in this guide and avoiding common mistakes, your French doors will operate smoothly and provide long lasting value for your home.
How to Install French Doors: Step by Step DIY Guide

Installing French doors can completely transform a home by improving natural light, creating elegant transitions between interior and exterior spaces, and increasing overall property value. Many homeowners assume the process requires professional contractors, but with the right preparation, tools, and patience, installing French doors can be achieved as a DIY project. This guide explains how to install French doors step by step, including preparation, tools, installation stages, and common mistakes to avoid.
Tools and Materials Needed to Install French Doors
Before starting the installation process, preparing the correct tools ensures the work can be completed efficiently and safely. Installing French doors requires both measuring tools and framing tools to properly align and secure the door frame. Having all necessary materials prepared in advance also helps avoid interruptions once the installation process begins.
|
Tool |
Purpose |
|
Tape measure |
Measure rough opening and door size |
|
Level |
Ensure the frame is perfectly straight |
|
Drill and screws |
Secure the door frame |
|
Shims |
Adjust alignment of the door frame |
|
Pry bar |
Remove existing doors or trim |
|
Caulk gun |
Seal edges for insulation |
|
Hammer |
Assist with framing adjustments |
These tools help ensure that measurements are accurate, the frame remains stable during installation, and the door is properly sealed once the installation is complete. Preparing everything in advance also allows you to focus fully on alignment and structural safety when installing French doors.
To better understand how door components work together during installation, see more:
https://doorsandbeyond.com/blogs/blog/the-essential-parts-of-a-door-all-you-need-to-know
Preparation Before Installing French Doors
Before installing French doors, preparation is the most important stage of the entire process. Proper planning ensures the door unit fits correctly and operates smoothly once installed. This stage usually involves measuring the rough opening, checking structural support within the wall, and removing any existing doors or framing materials.
Taking time to prepare the opening carefully helps avoid alignment issues, structural problems, and air leaks after installation.
Measure the Rough Opening
Measure both the width and height of the existing opening carefully using a tape measure. It is recommended to measure in multiple places to ensure the opening is consistent across the frame. French doors require a slightly larger rough opening than the door unit itself so that installers can adjust the frame using shims during installation.
|
Door Size |
Rough Opening |
|
60 x 80 inches |
62 x 82 inches |
|
72 x 80 inches |
74 x 82 inches |
Accurate measurements are essential because even small errors can cause the door frame to sit unevenly inside the wall opening. A properly sized rough opening ensures the French doors can be aligned correctly and operate smoothly after installation.
Check Wall Structure
If you are installing French doors in an exterior wall, it is important to determine whether the wall is load bearing. Load bearing walls support the structural weight of the building and therefore require proper headers to distribute the load above the door opening.
Failing to install the correct structural support can lead to sagging, cracking drywall, or long term structural damage. If you are unsure whether the wall is load bearing, consulting a contractor or structural professional before installing French doors is recommended.
Remove the Existing Door or Opening
If the installation replaces an existing door or window, remove the current door panels, trim, and frame using a pry bar. Take care not to damage the surrounding wall framing while removing these components.
Once the old door is removed, clean the entire opening thoroughly and inspect for uneven framing, damaged wood, or moisture issues. Preparing a clean and stable opening ensures the new French doors can be installed securely and aligned properly.
Step by Step Guide to Installing French Doors
Installing French doors involves several precise steps that must be followed carefully to ensure the door operates properly and remains weather resistant. Each step plays an important role in maintaining the stability of the door frame and preventing long term issues such as water leaks or misaligned panels.
Following a structured installation process helps ensure the final result looks professional and functions smoothly.
Step 1: Prepare the Opening
Before installing the door frame, inspect the rough opening carefully to ensure it is square, level, and structurally sound. Use a level to check both vertical and horizontal alignment of the framing. If the floor or framing is uneven, adjust the surface using shims or minor framing corrections before placing the door unit.
Preparing the opening correctly is essential because the entire door installation depends on the accuracy of this base structure.
Step 2: Install the Sill Pan
A sill pan is an important protective component installed at the bottom of the door opening. It prevents water from entering the house by directing moisture away from the door frame and toward the exterior surface.
|
Component |
Purpose |
|
Sill pan |
Directs water away from door |
|
Flashing tape |
Prevents water intrusion |
|
Sealant |
Improves insulation |
Installing a sill pan significantly reduces the risk of water damage around exterior French doors. Without proper moisture protection, rainwater can slowly penetrate the frame area and cause long term structural damage to surrounding materials.
Step 3: Position the Door Frame
Carefully lift the French door unit and place the frame into the prepared opening. Depending on the door size, this step may require two people to ensure the frame remains stable during positioning.
Once the frame is inside the opening, temporarily hold it in place using shims while checking alignment. Ensuring the frame sits evenly within the opening helps simplify the next steps of leveling and securing the structure.
Step 4: Shim and Level the Frame
Use a level to check that the frame is perfectly vertical on both sides and level across the top. Insert shims between the frame and the wall studs where adjustments are required.
Proper shimming ensures the door frame stays stable and prevents twisting or warping over time. When installing French doors, accurate leveling is critical because even small alignment errors can cause the door panels to rub against the frame or fail to close properly.
Step 5: Secure the Frame
Once the frame is fully aligned, secure it by drilling screws through the frame and into the surrounding wall studs. Tighten screws gradually while continuously checking alignment with a level.
Securing the frame evenly helps prevent shifting during long term use. Proper anchoring also ensures the frame remains structurally stable when the door panels are opened and closed repeatedly.
Step 6: Hang the Door Panels
Attach the door panels to the hinges installed on the frame. After mounting the doors, open and close both panels several times to confirm they move smoothly and align correctly when closed.
Double swing doors are often used in wider openings because they create better movement between connected spaces. See more:
https://doorsandbeyond.com/blogs/blog/types-of-swing-doors
Step 7: Install Hardware
Install the door handles, locking mechanism, and strike plate according to the manufacturer instructions. Proper alignment of hardware components ensures the doors close securely and lock correctly.
Hardware installation also contributes to the durability of the door system. If the handle or lock is misaligned, the door may not close properly or may place unnecessary pressure on the hinges over time.
Step 8: Seal and Weatherproof
Once the door frame and panels are installed, seal the perimeter of the frame using exterior grade caulking. Proper sealing prevents air leaks and protects the door frame from rainwater and moisture.
|
Sealing Method |
Benefit |
|
Exterior caulk |
Prevents air leaks |
|
Weatherstripping |
Improves insulation |
|
Flashing tape |
Protects against moisture |
Effective sealing improves energy efficiency and helps maintain indoor comfort by preventing drafts. It also extends the lifespan of the door installation by protecting the structure from moisture damage.
Common Mistakes When Installing French Doors
Even experienced DIY installers can encounter problems when installing French doors if small details are overlooked. Many installation issues occur due to inaccurate measurements, improper frame alignment, or insufficient sealing around the door frame.
|
Mistake |
Result |
|
Incorrect measurements |
Door does not fit opening |
|
Uneven frame |
Doors stick or misalign |
|
Poor sealing |
Air and water leaks |
|
Weak anchoring |
Door frame shifts over time |
Avoiding these common mistakes helps ensure the door operates smoothly and remains durable for many years. Taking extra time during measurement and alignment stages significantly reduces the likelihood of installation problems.
How Long Does It Take to Install French Doors
The time required to install French doors depends largely on the complexity of the installation and the condition of the existing opening. Projects that replace an existing door frame typically require less preparation compared to installations that involve structural modifications.
|
Project Type |
Estimated Time |
|
Replacing existing door |
4 to 6 hours |
|
Installing into new opening |
1 to 2 days |
|
Exterior wall modification |
2 to 3 days |
Planning the installation timeline in advance helps ensure the project proceeds smoothly. More complex installations may require additional time for structural adjustments, framing work, and finishing details.
For a detailed cost breakdown including materials, hardware, and labor factors, see more: https://doorsandbeyond.com/blogs/blog/how-much-does-a-french-door-cost-tips-to-save-your-money
Conclusion
Installing French doors is a rewarding home improvement project that can significantly enhance the appearance and functionality of a space. With proper planning, accurate measurements, and careful installation techniques, homeowners can successfully complete this project without professional assistance. By following the steps outlined in this guide and avoiding common mistakes, your French doors will operate smoothly and provide long lasting value for your home.


